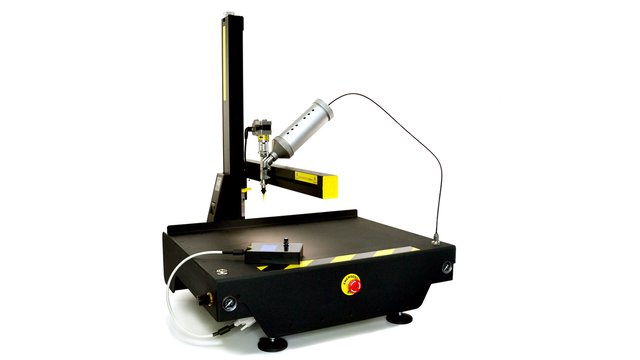
Deze pagina bevat alle informatie die je nodig hebt om een eerste start te maken met onze 3D keramiek printer (Lutum 4.5). Met dank aan Jingge voor het schrijven!
As a designer graduated from ArtEZ product design, I have a deep passion for ceramics and modern technology. I’ve spent significant time exploring the fascinating world of 3D ceramics printing within FabLab Arnhem and therefore I would love to share my 3D ceramics printing experience with others who are interested in learning more about this exciting technique.
You can find more info about my work here:
0. Requirements #
This manual assumes that you have a basic understanding of 3D printing. Make sure to download and install the last version of Prusaslicer. The config and test files can be downloaded below (Note: these are just starting parameters):
Download Config Download Test Files
1. Prepare the 3D model #
- Before printing, you need a 3D model of the object you wish to create. Prepare your document from any 3D program you like. Make sure to save it in STL format.
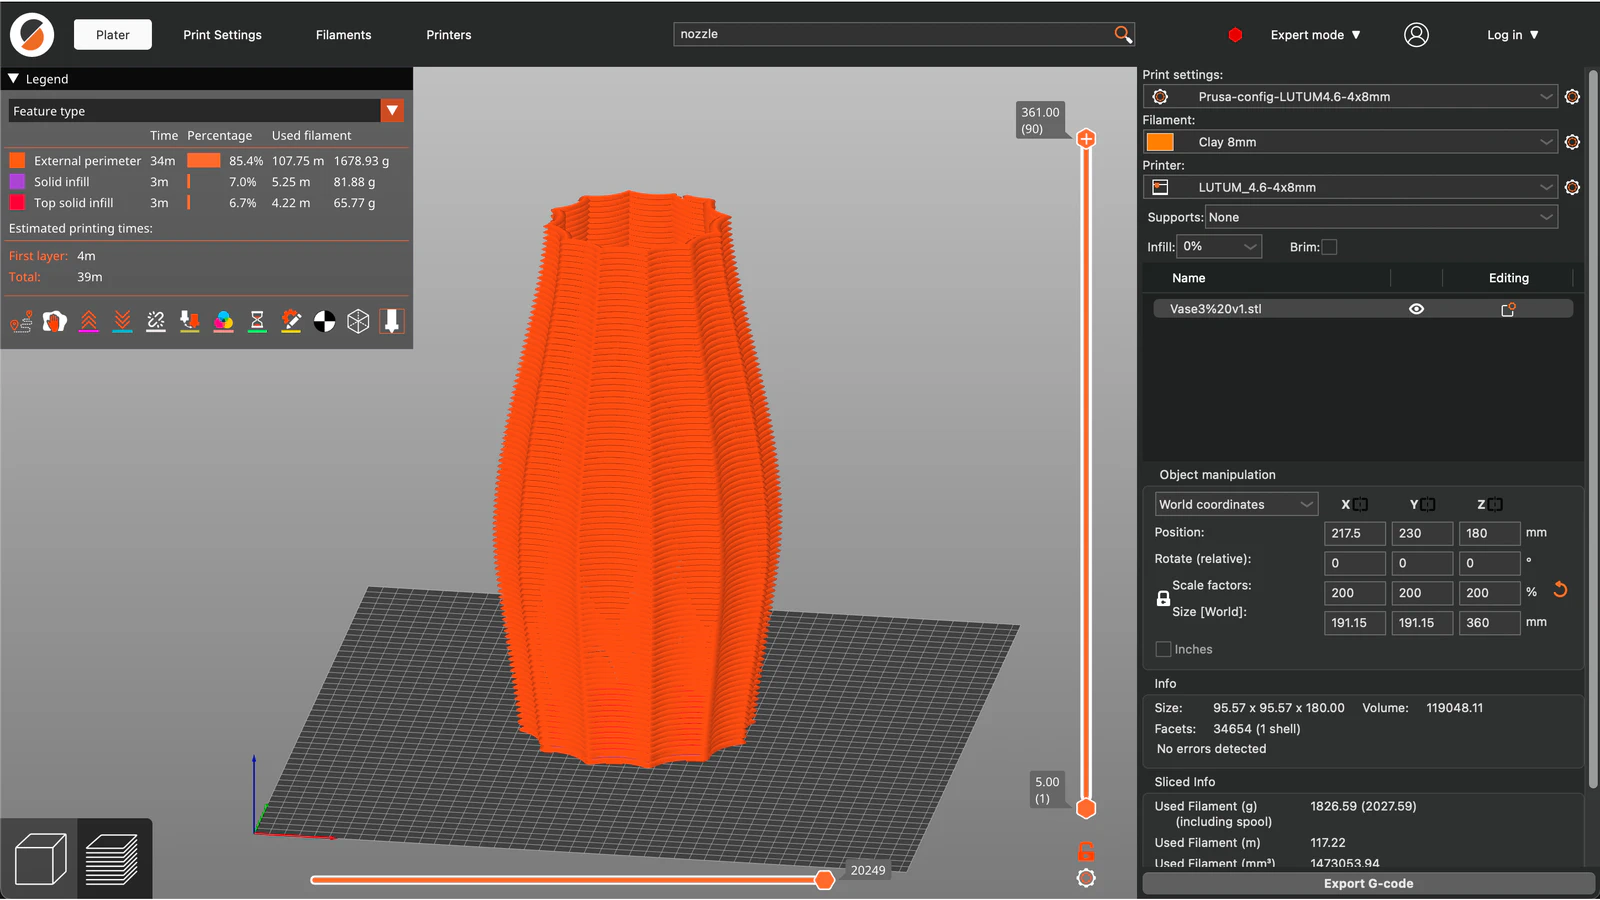
- Open PrusaSlicer and import the Prusa-config which is specific for the Lutum 4.5.
- Afterwards, import your file to PrusaSlicer and locate it in the right position and angle.
- Check for all the print settings to make sure they match the size of the nozzle you will use. The main things to consider are layer height, extrusion width and filament diameter. (✨If you would like to have one continous piece print, always click on spiral vase✨)
- When you are ready, choose SLICE NOW from the bottom. If everything is good, you can export your file into G-code format.
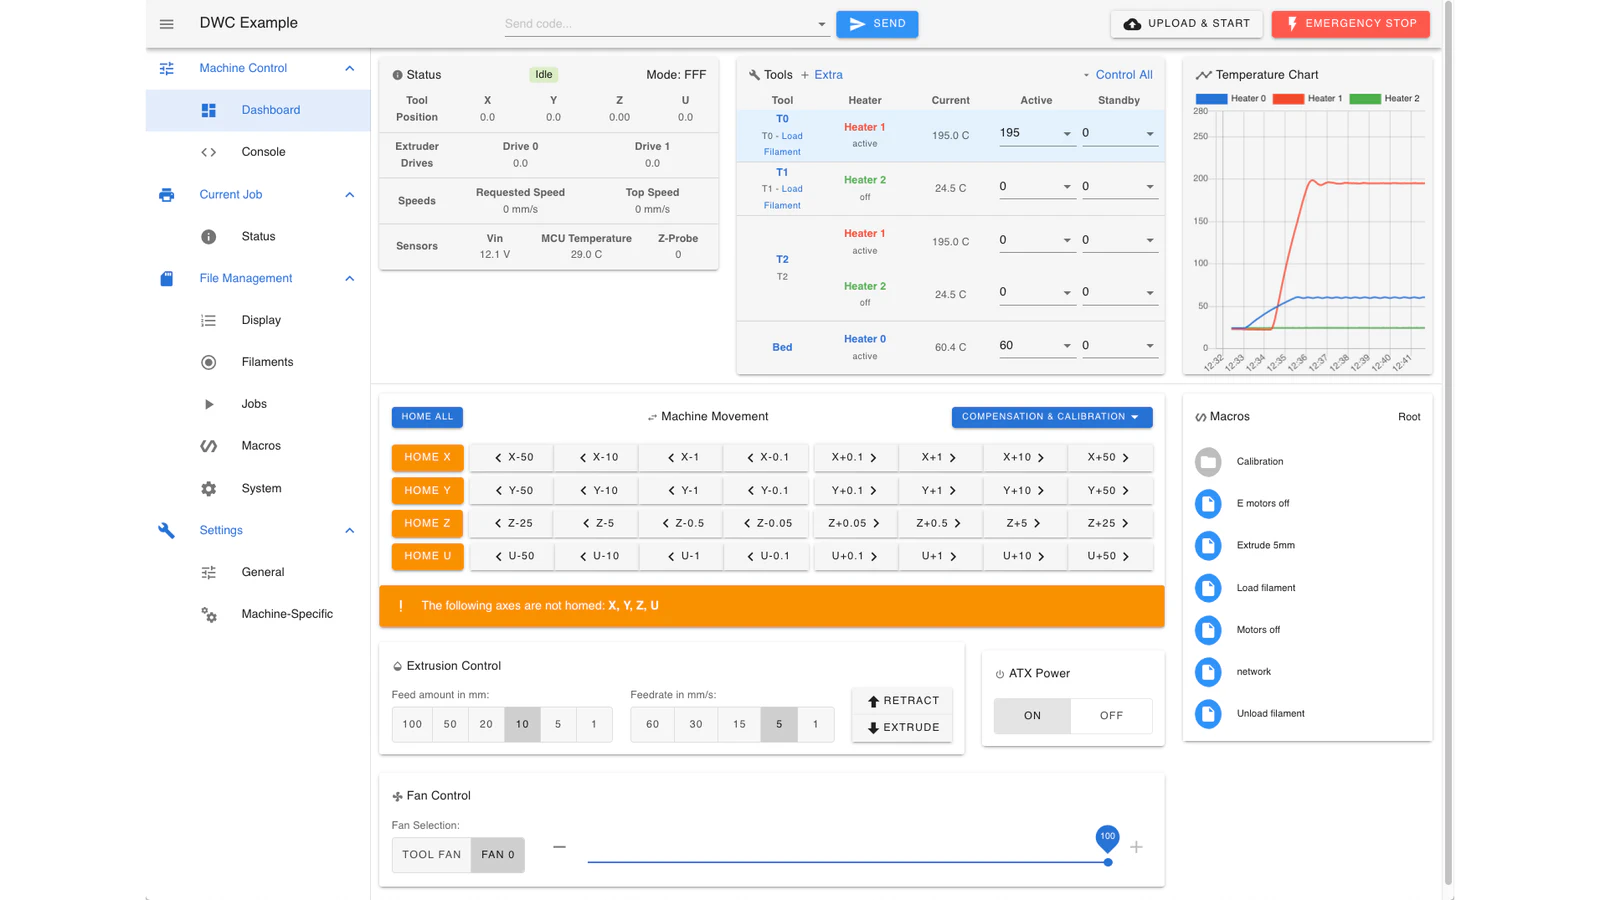
- Connect to the device over WIFI (It will show up as an AP called ‘Lutum’ and the password is ‘password’)
- The last step is to upload your file to the machine: http://192.186.2.100/Files/Jobs
2. Prepare and load the materials #
The machine is suitable for any kind of fine clay with a grain size under 0.5. There are a few options for the materials.
- Make your own clay
- Order premade clay online e.g www.keramikos.nl
For the premade clay online, you can choose:
| Name | species | Color | Biscuit | Firing range |
|---|---|---|---|---|
| 3D PRAI | Stoneware | White | 1000ºC | 1240-1300ºC |
| 3D ANETO | Porcelain | White | 1000ºC | 1230-1270ºC |
| 3D PF RED | Eathenware | Red | 1000ºC | 970-1055ºC |
✨ Precoloring your clay with special pigment is also an option. ✨
To insert the clay in the plastic capsule, take a big amount of clay which is larger than the diameter of the capsule and press the material into it. This will ensure there are no air pockets inside. Continue this process until you fill-up the whole capsule. Watch the video below for a short demo. Make sure to clean the outside of the tube before inserting it into the metal cylinder.
3. Prepare and set up the printer #
Insert the plastic capsule filled with clay into the metallic cylinder.
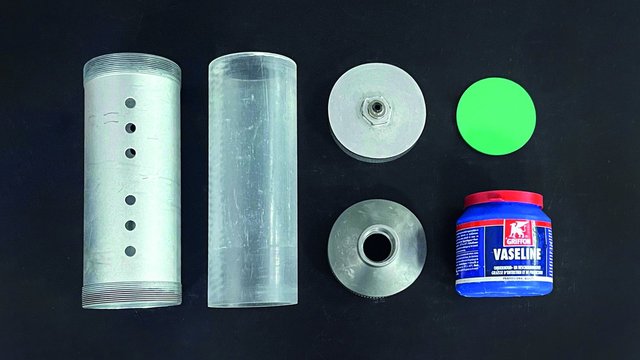
Apply Vaseline fat to the inside of the lids (rubber gasket). Make sure to close both the top and bottom properly so the air will not go through. You can use the metal clamp and leather strap to close them tightly.
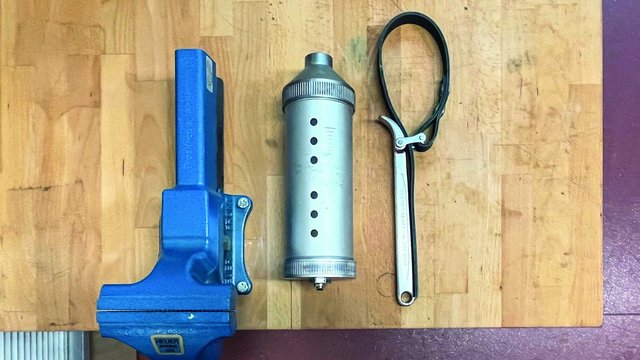
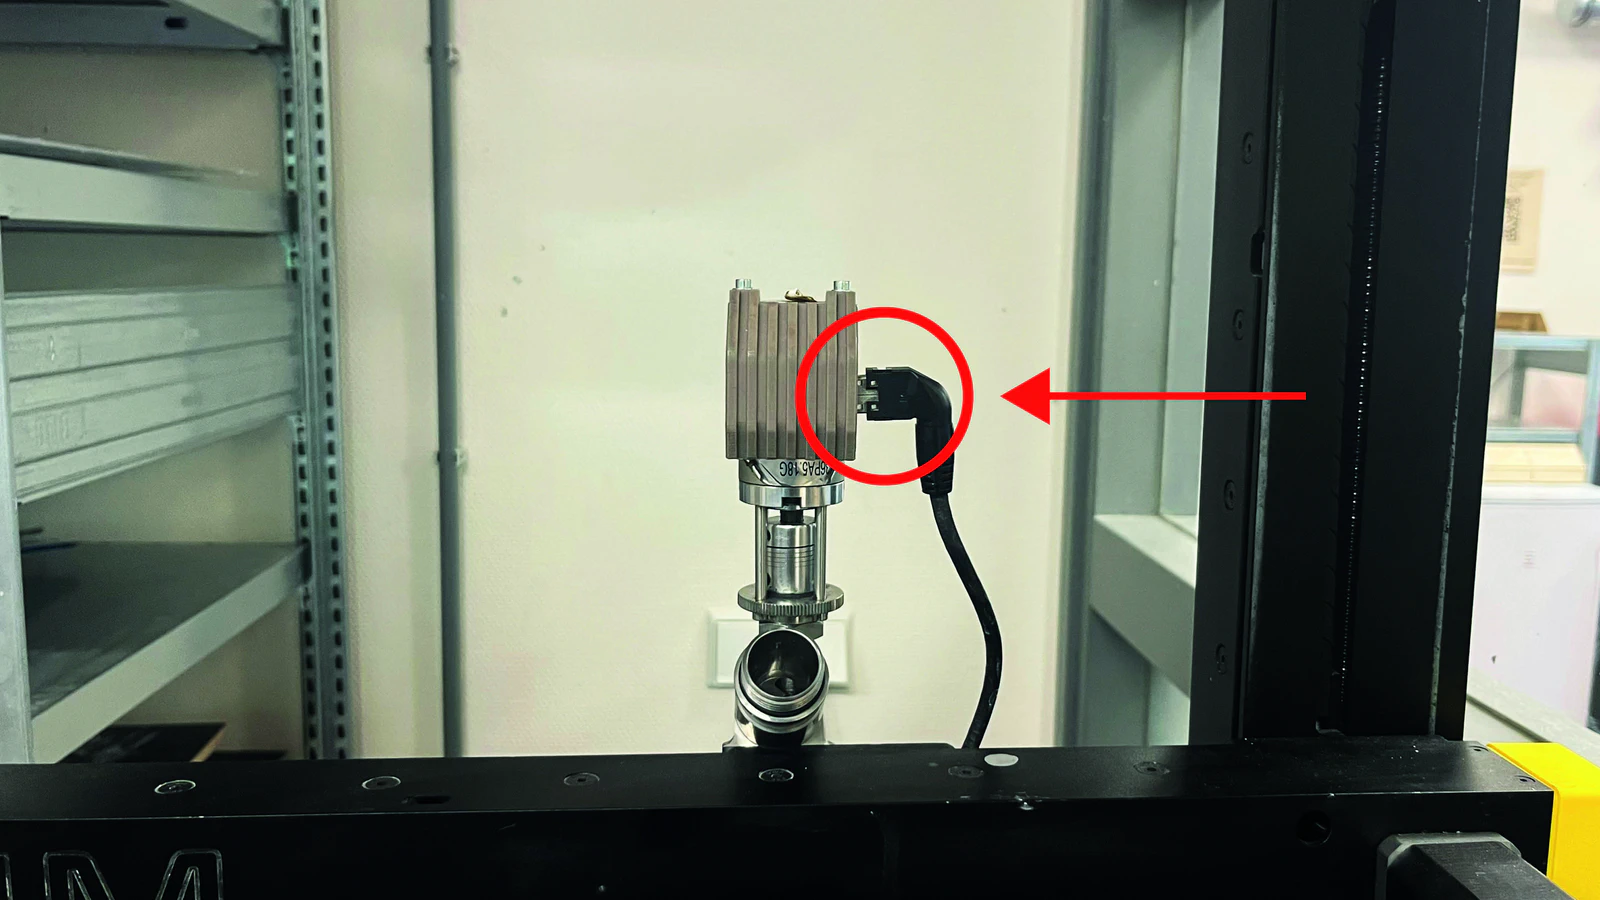
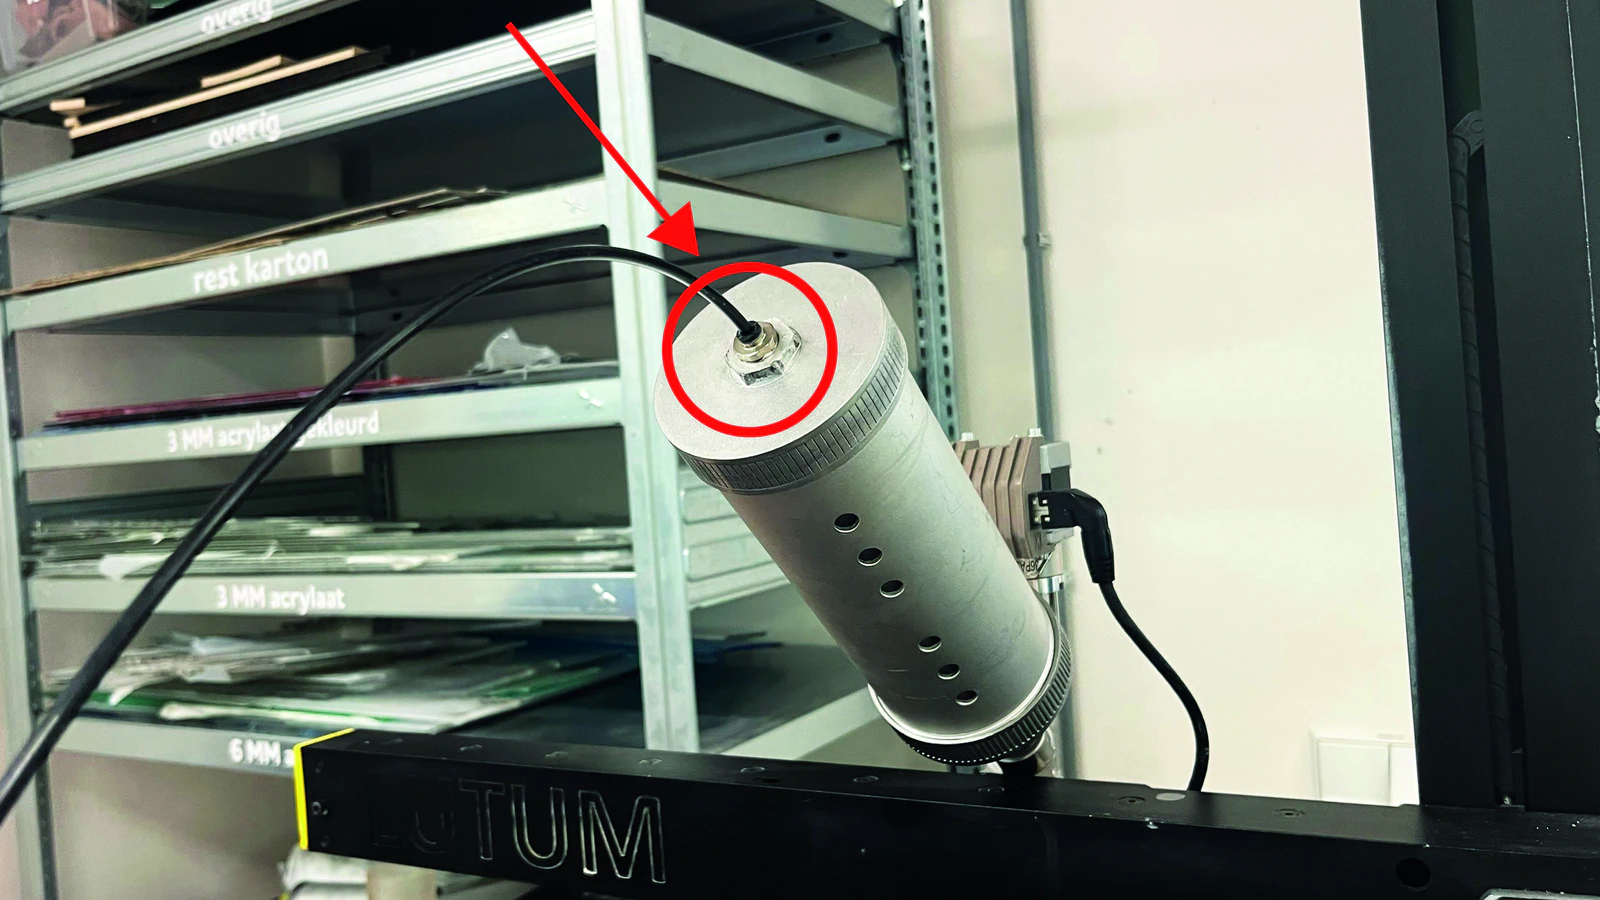
Put all the components together: screw on the nozzle and the capsule. Then plug in the cable and attach the air pressure tube.
![]()
![]()
Turn on the printer with the large switch on the front (bottom).
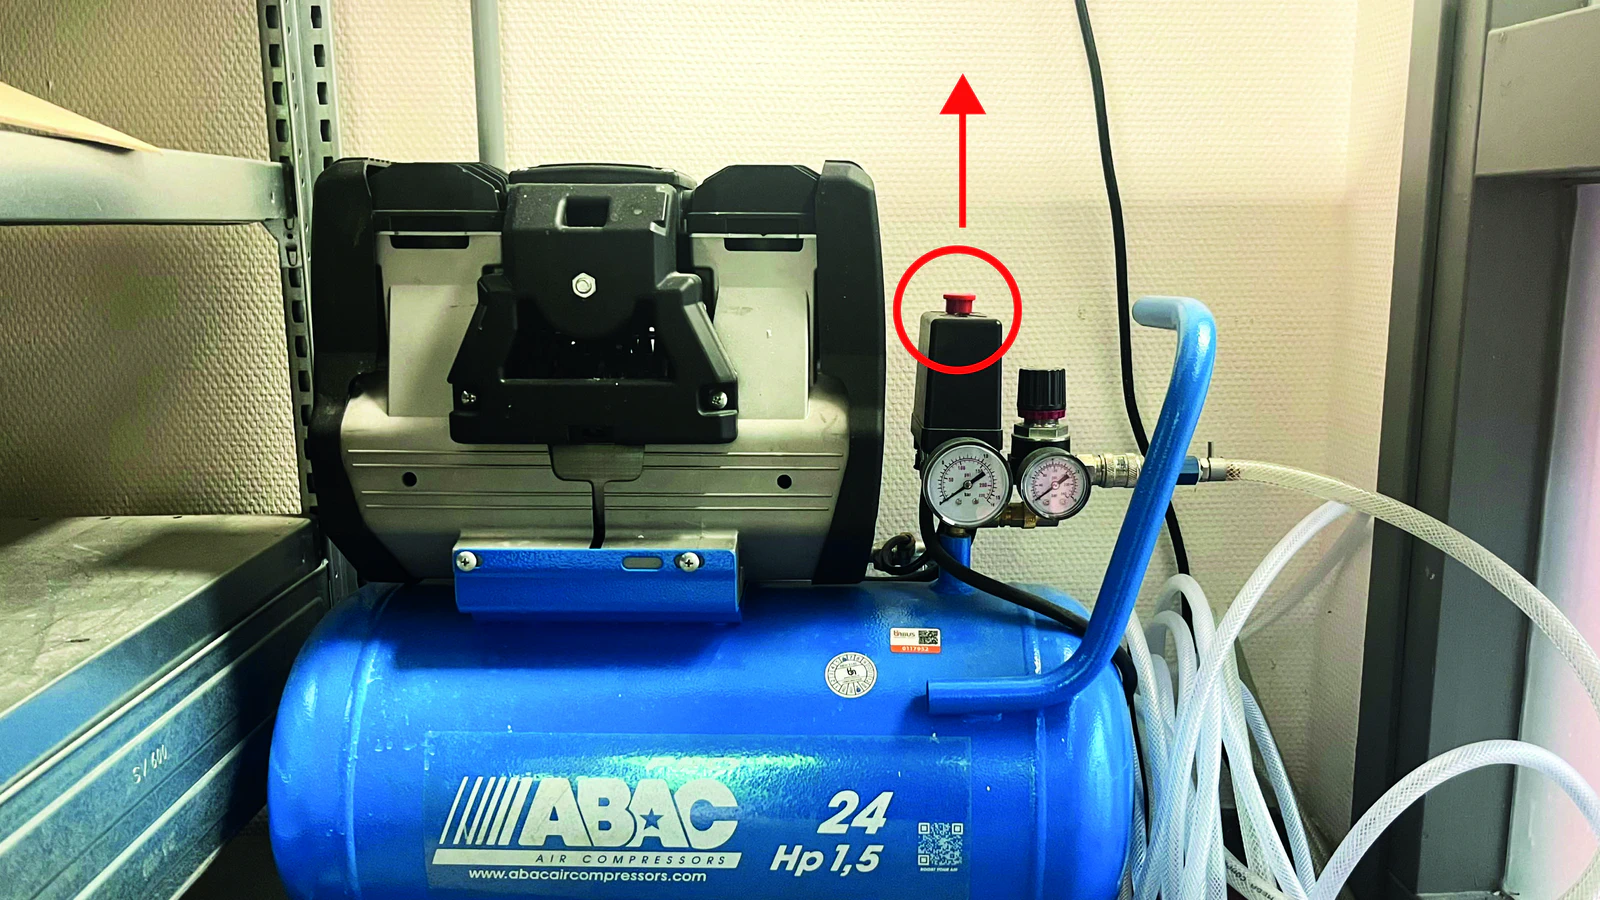
Pull up the red button from the air pressure pump. Rotate the other button on the side of the printer untill you can see the pointer starts moving. We most commonly use an air pressure between 3 and 4 bar, but it still depends on the consistency of the clay. However, make sure to never raise the air pressure above 5 bar.
![]()
![]()
Always lower the air pressure to the minimum before disconnecting the tube from the metal capsule. Never raise the air pressure above 5 bar.
After the machine starts, go to the screen and select “home” to locate the home position. Make sure there is enough space in between the nozzle and the bed.
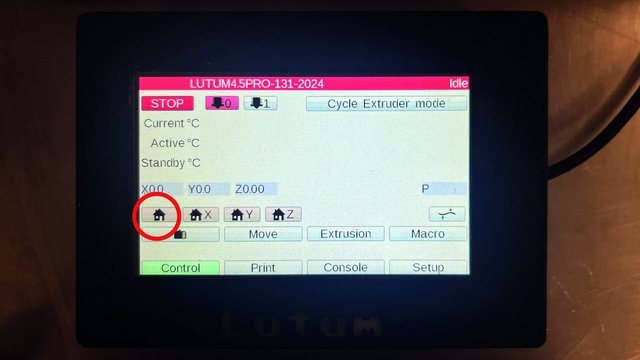
IMPORTANT: The nozzle should not touch or be lower than the bed. It can cause damage to the printer. If your are uncertain about this. Move the build plate to the side first before homing.
Ensure the bed is level. Take a wooden board (betonplex) and place it on the bed where you are going to print. If the wooden board is too slippery, using some tape always helps!
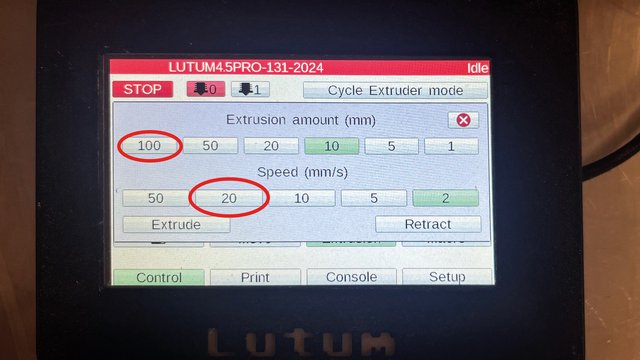
The last step is calibration. Go to “Extrusion” on the screen and select “100 mm Extrusion amount” with “20 mm/s speed” to ensure the printer works well. The clay should extrude smoothly without tearing or dragging.

4. Print the objects #
On the website, find your file from “Jobs”, click on the file and select “Start File” to start printing.
when the printer starts, it can be possible that the nozzle is too far away from the wooden board so the clay won’t stay at the position. Don’t worry, this is very common in the beginning. The printer can stop or pause anytime from the screen and website. After adjusting the setting, you can remove the failed prints with a putty knife and restart it over again.
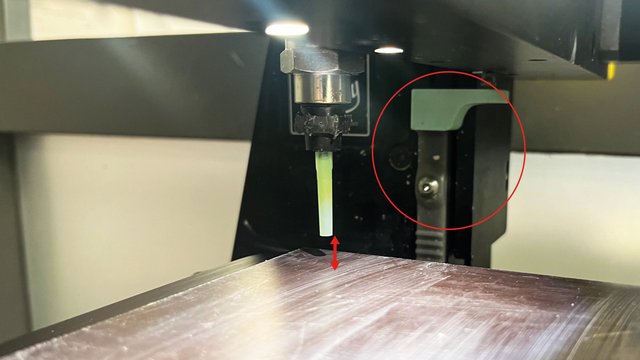
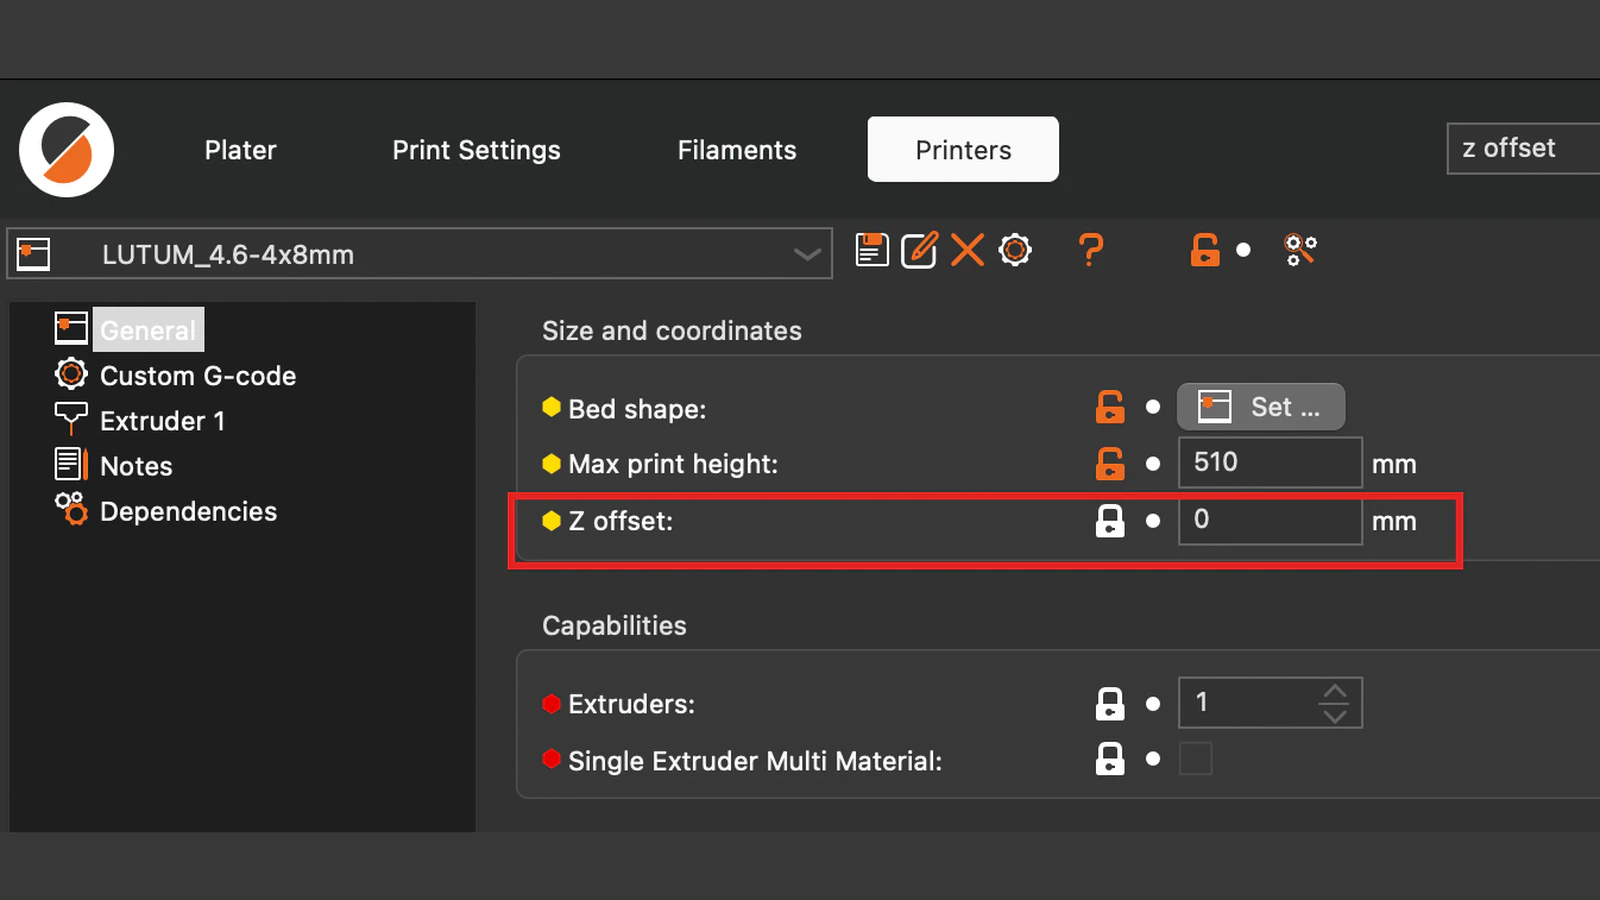
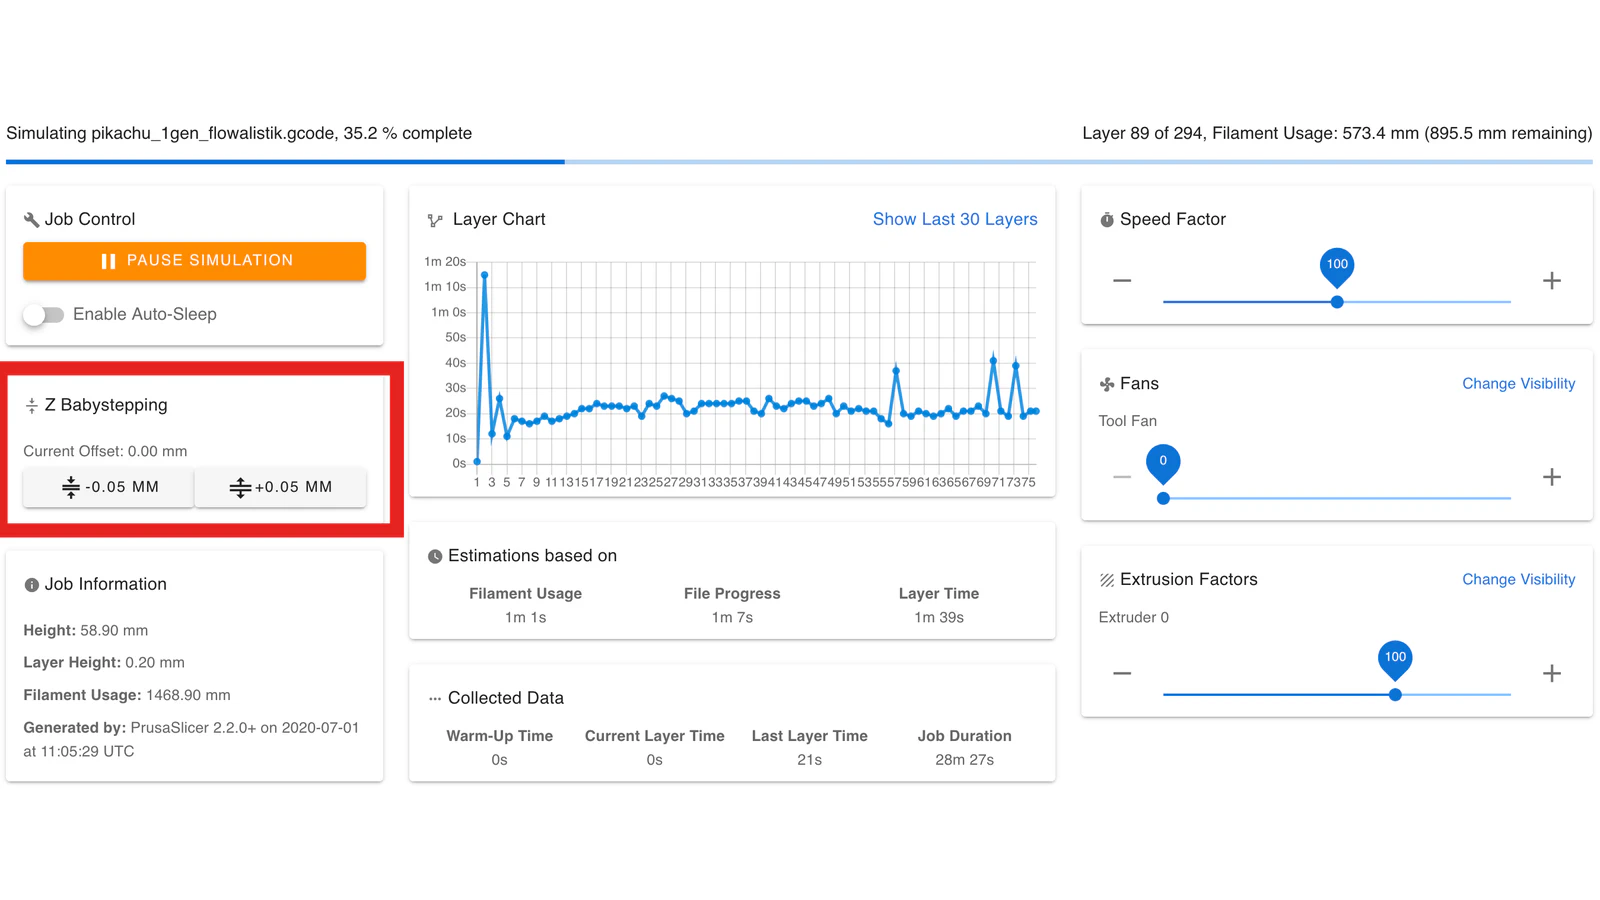
There are multiple ways to increase or decrease the nozzle distance to the buildplate (This can vary alot based on the nozzle you use). The first option is to mechanically change the distance by unscrewing the Z-Endstop (green plastic object indicated with the red circle in the picture above) and moving it lower (to decrease the distance to the build-plate) or by moving it up to increase the distance to the build plate. The second option is to change your Z-offset in the slicer. This is useful for finetuning and stays the same everytime you reslice a file. However, it is not meant for large negative values, because you will run into the endstop (max 2mm). The final option is called ‘babystepping’ and as the name implies, it is also meant for small adjustments. The added benefit of this approach is that you don’t have to reslice the file since this is an option in the webinterface.
![]()
![]()
Once the printer starts, you can check if the extrusion of the clay is alright. If the flow of the material is not consistent enough, for example if there are a lot of gaps visible in the clay, it means the air pressure or extrusion needs to be changed.
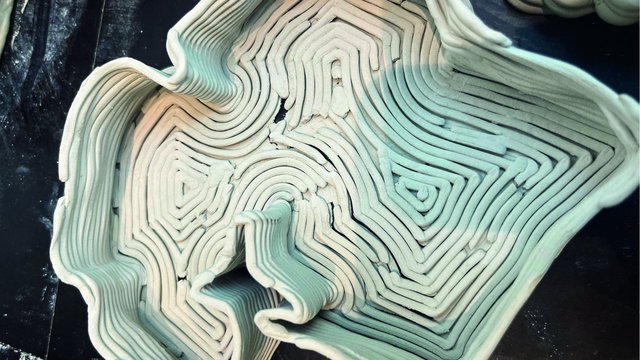
Under extrusion Sometimes, gaps or bubbles appear during printing, not because of the settings but because of the existing air inside of the clay from the capsule. In this case, you have to fix it manually.
Once your model is fully printed, the nozzle will go back to the top right corner. It means the printed object can be taken off from the printer.
Tips
It can happen that the clay does not get a bond and leaves behind a small gap. It is possible the next layers will also not get a bond and eventually ruin your design. Fixing by hand is a solution. While printing, always check the amount of materials left from the metal capsule from time to time. Do not risk finishing the clay, otherwise the air pressure will come out of the nozzle and crash your model.
5. After printing #
Cleaning the machine is also a very important part. If the machine is not taken care of, it can cause a lot of problems. To allow others to work with the 3d ceramic printer as well, please be sure to follow these rules:
If the machine is going to be used within a few days, it is not necessary to clean all parts of the machine.
- To put the nozzle to its original position, select “home” on the screen.
- Then, rotate the air pressure button back to 0 and push back the red button from the air pump.
- Remove any clay from the build surface.
- Important: Make sure the nozzle is soaked in water so that the clay won’t dry out by exposure. Do this by putting a cup underneath the nozzle. Do not spill any water.
If the printer won’t be used within a few days, you have to take all parts off and clean them deeply to avoid the clay from hardening in the machine.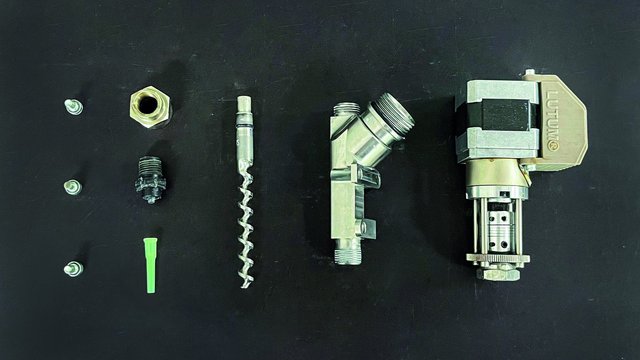
- Disconnect the air pressure tube and take off the metal capsule.
- Open up the capsule and take out all leftover clay.
- Use an allen key to take off and separate all printing parts.
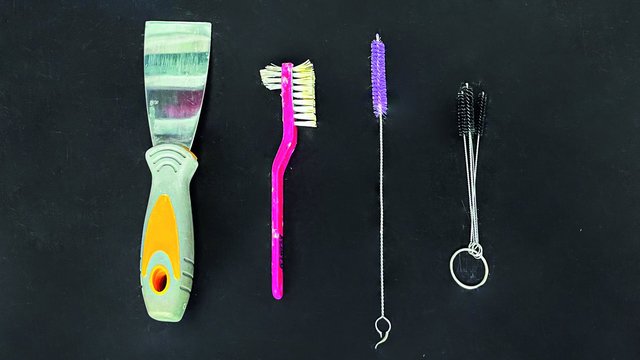
- Deep clean all of them with small brushes.
- Put them back in the right order and attach to the machine.
6. Dry and fire the printed objects #
After the print is complete, it must dry completely before it can be fired in a kiln.
- After taking the printed object from the printer, put it in a safe place with sufficient air circulation. Allow the printed object to dry naturally to prevent cracking.
- Depending on the size and complexity of the object, drying can take anywhere from several days to over a week.
- At the beginning, your work will stay on the wooden board. After a few days of drying, it will get separated.
- When the clay becomes a different color, it means the object is completely dry. That is a signal to send your printed work into a kiln for bisque firing.
- After bisque firing, you can apply glazes before the final firing. There are various ways to apply glazes such as applying with a brush or spraying with an airbrush.
- In the end, your 3D ceramic printed work is finally finished!
Tips: If needed, lightly sand any rough edges and fill some air gaps. This can be done during the drying process.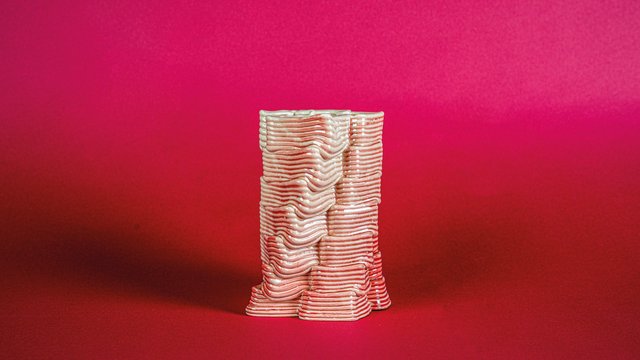
✨Additional Tips✨ #
- Shrinkage: Account for shrinkage (around 10-15%) during the firing process by slightly scaling up your 3D model.
- Experiment with nozzle sizes: For a more textured, organic finish, use a larger nozzle. For fine, intricate details, opt for a smaller nozzle.
- Air bubbles: Ensure the clay is free from air bubbles to avoid holes and cracks during printing and firing. Kneading the clay before loading it into the printer can help eliminate air pockets.
The end: Using a 3D ceramic printer can be a complex but rewarding process, allowing you to create intricate and personalized ceramic pieces with more precision than traditional methods. By understanding the workflow and material characteristics, you can achieve both functional and artistic results. This is not an easy technique. It needs a lot of patience and steps. The more you use the machine, the better your result will become!